
Lit LIST will show you the steps you need to draw a list of data items from a database table.
When I started showing the first set of AMP JAMS to friends and colleagues, the feedback I got was "Where are the GUITARS??"
So we're doing guitars. Ready?? Let's JAM!
You can open a completed version of the project in your browser here.
If you want to download completed versions of the PHP scripts for this project, you can find them here.
This project has several steps that introduce you to CodeIgniter concepts and details:
- Copy the CodeIgniter files and put them in a new project folder.
- Set up a new database table.
- Edit "config.php" to set up the"base_url"
- Edit "autoload.php" to load the database library
- Edit "database.php" to configure the database connection.
- Edit "routes.php" to set up the "landing page" for the project.
- Set up a new Controller for the project.
- Set up a Model for the database queries.
- Pass the database results to the View.
- Build the View
- Add a "Detail" page.
This is a lot to do, but it's mostly paying dues to get in the club. These steps are needed for each new project, but once you get some experience, they become quite simple to do.

Project Set-up. As always, set up a directory in the htdocs folder to hold your project. The recommended name is n413_litlist.
Copy all the files from the Welcome project into your project folder. Or you can start with a clean set of CodeIgniter files from the initial download, which you can get from here.
For this project, we will need images, jQuery, and Bootstrap. Create a directory in your project folder named assets. Inside this folder, create directories for "css", "images", and "js".
Copy these files to the css folder:
- bootstrap.min.css
- bootstrap.min.css.map
Copy these files to the js folder:
- bootstrap.min.js
- bootstrap.min.js.map
- jquery-3.4.1.min.js
You can copy these files out of a previous project, such as The SITE, or you can find Bootstrap links here, and jQuery links here. CDN links and package manager options are also available.
Also, get a set of images to copy into the assets/images folder here. Be sure they are moved out of the guitars folder into assets/images.
New Database Table. Make a database table to hold the new list. The simple way to do this is to copy the "list" table's structure. Open phpMyAdmin and go to the ampjam_db database. Click on the "list" table in the left side menu to open the table. Click the "Operations" tab, and you will see a page that provides several useful functions, including a way to copy tables:
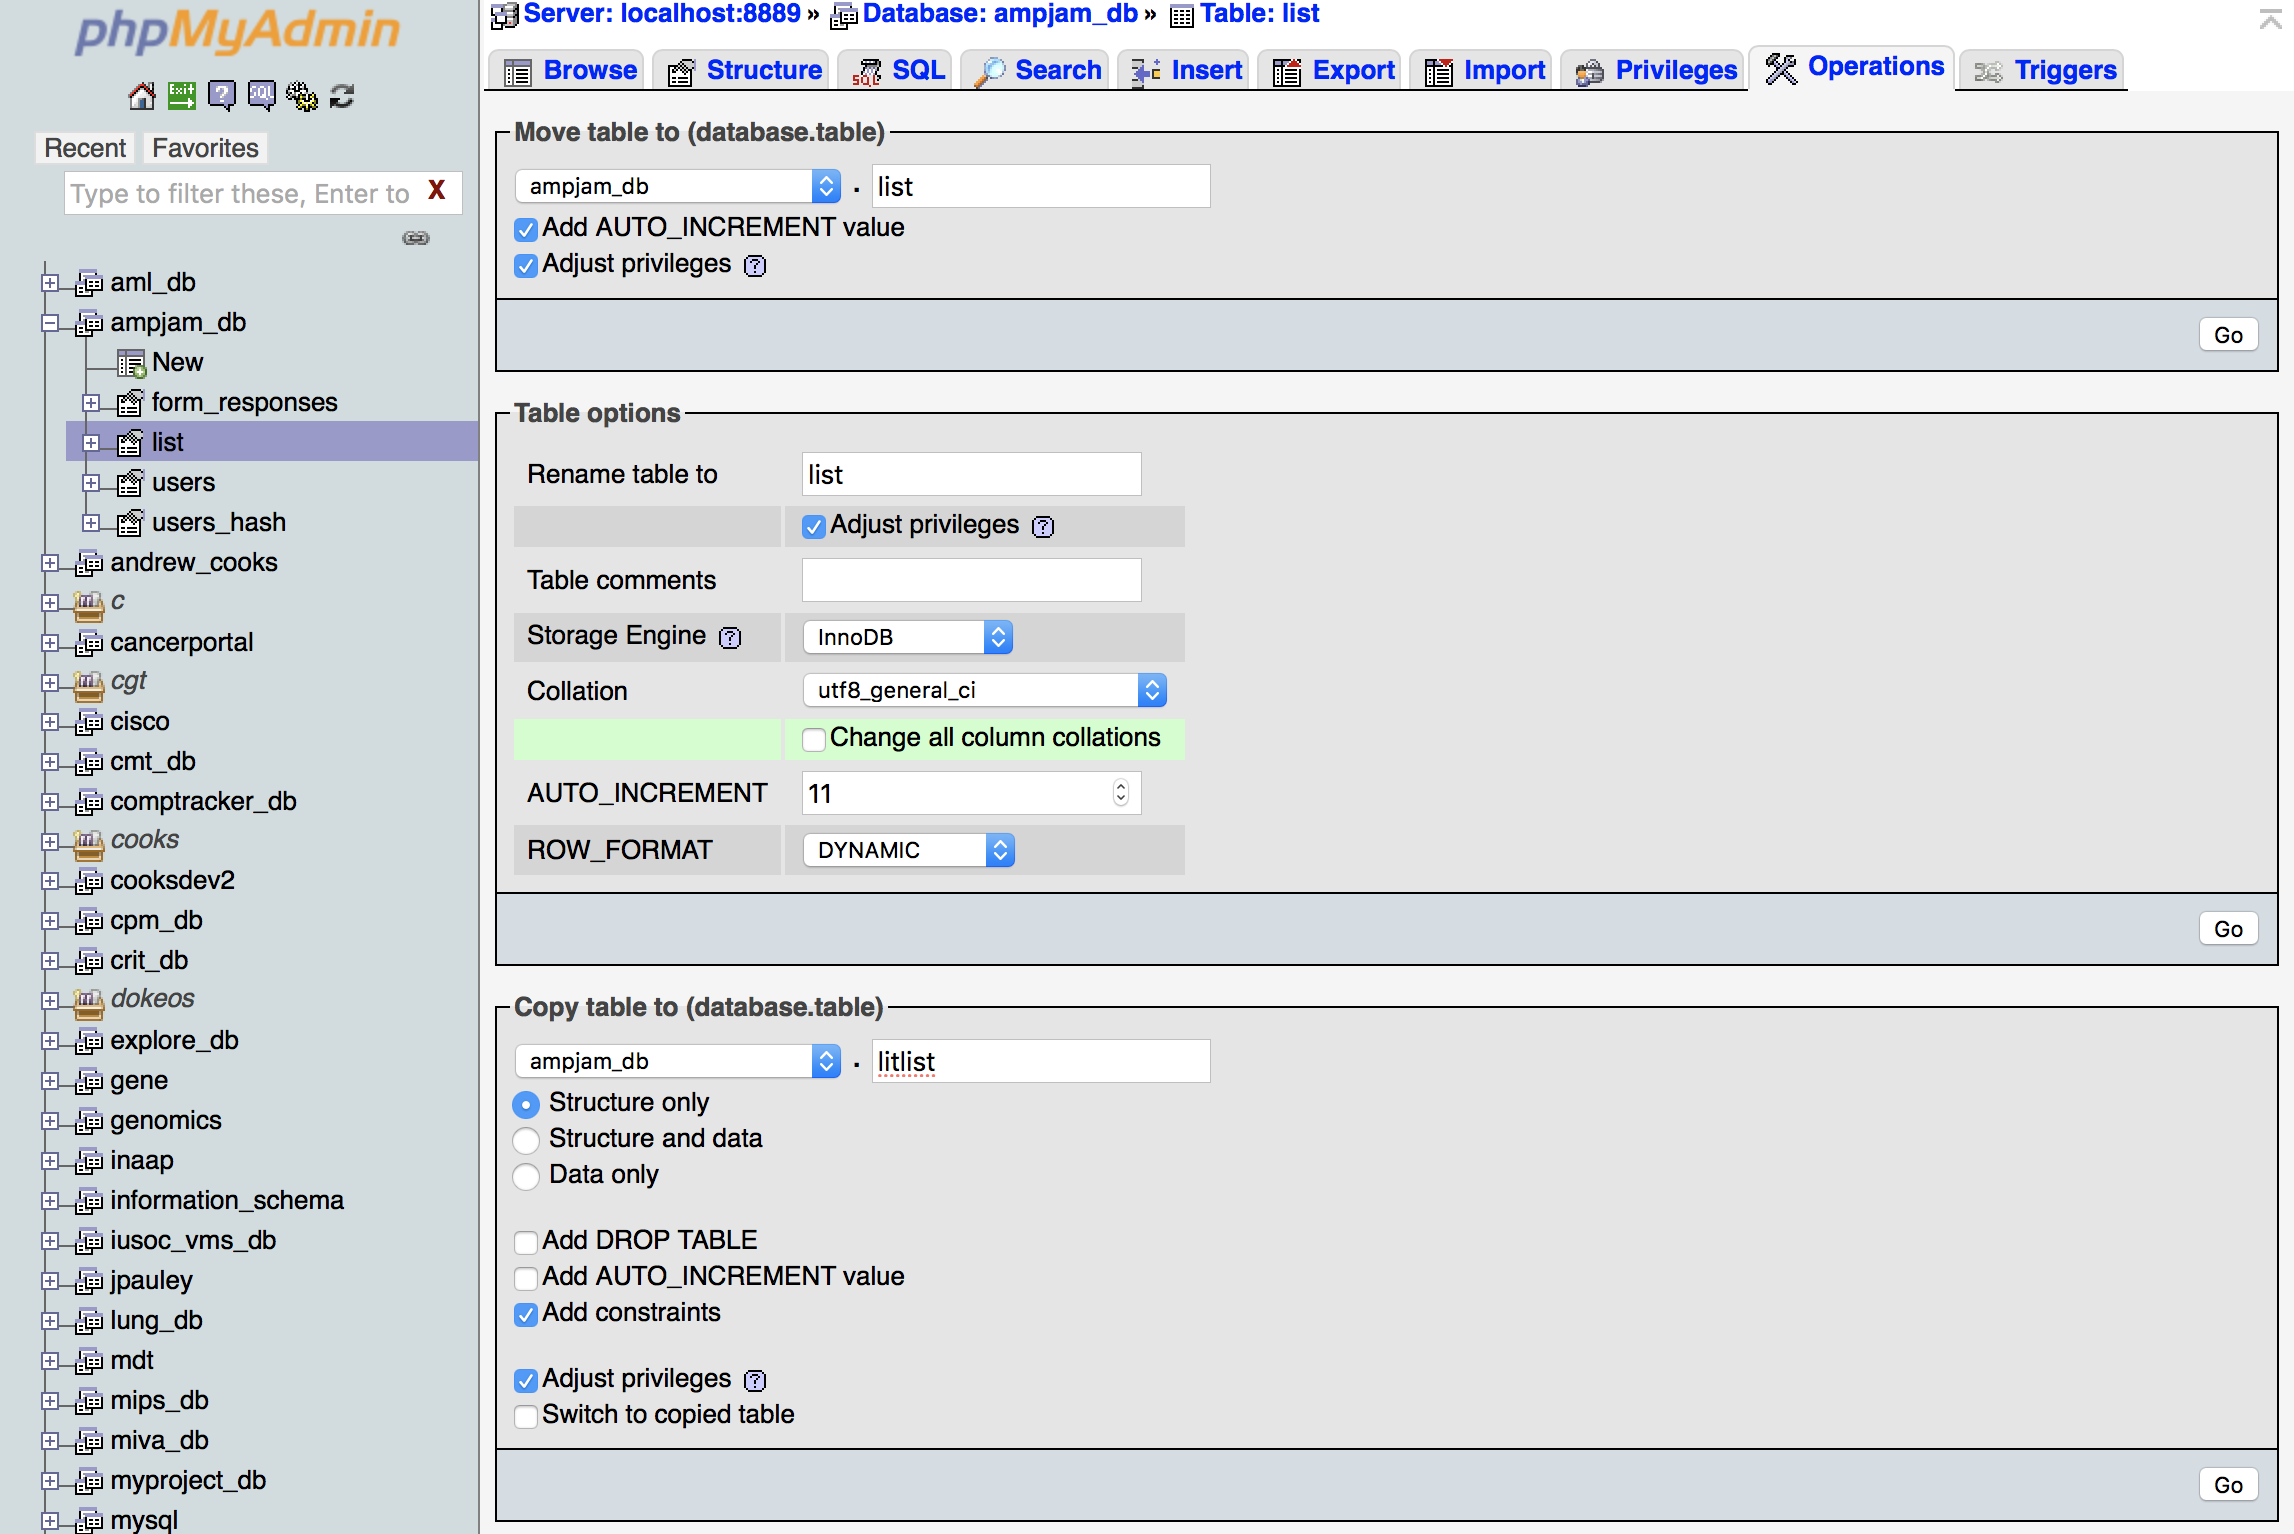
Name the new table "litlist" and enter that name in the "Copy" form. Also, select the "Structure Only" option. This will give us an empty table with the columns and data types we need. Click "Go" and the new table will be created.
You can use an SQL script to either create the table, insert the data, or you can insert your own data. If you want to use the official exercise data, the SQL script is here. Follow the same steps you used in The TABLE.
config.php. Open the application folder and the config folder. Look for a file named config.php and open it. (application/config/config.php) Most of this file is explanatory comments, with several values for the "$config" array defined. You should have a look through this list to get familiar with what is here. We will need to set the "base_url" value.
CodeIgniter does not play well with relative URLs. It is almost always necessary to use absolute URLs anytime a link is needed. To make this a little easier, there are some "helper" functions that store the "base" part of the URL so you don't need to type it repeatedly. This has the added benefit of making it much easier to move the project to a new server by storing the server-specific part of the URL in one place, where it will only need to be updated during the configuration process.
The $config["base_url"] value is where we store the server path to the project. For MAMP users, this string will be:
$config['base_url'] = 'http://localhost:8888/n413_litlist/';
For XAMPP users:
$config['base_url'] = 'http://localhost/n413_litlist/';
Be sure the trailing slash is included in the URL.
Look down to the "Index" section, and notice that $config["index_page"] is set to 'index.php'. These two values will be combined for URLs that resolve inside the project, such as navigation from page to page. A "helper" function called site_url() will do this for you. When you need to fetch resources such as CSS files or images, you will use a "helper" function called base_url(), which only returns the "base_url" value, without the "index.php" added on.
These "helper" functions are only available to you if you set them up in "autoload.php", so do that now.
autoload.php. Open "autoload.php", located in the config directory. (application/config/autoload.php) This file is also mostly explanatory comments, with values you can set for various keys of the "$autoload" array. Most of the values you can set are also arrays, so you should be careful that you keep the array syntax when you enter values. Notice that the comments give you examples of how the syntax should be. It's a good idea to just copy what is there and use it directly. Start with the "helper" functions at about line 92. The helpers you want are the "url" helpers. This will include base_url() and site_url(). The example includes the "url" helper, so just copy/paste the example and get the "file" helper for free:
$autoload['helper'] = array('url', 'file');
You will also want to autoload a couple of libraries, so scroll back up to line 42. You definitely want the "database" library, and eventually we will use the "session" library. Maybe even "email" if we stay with this long enough. Happily, you will see an example that loads those 3 in the comments. Copy/paste and set the library autoload like this:
$autoload['libraries'] = array('database', 'email', 'session');
Easier to do than to explain.
database.php. Now, for the database config. This is one of the configurations you will have to do whenever you change servers or databases. Open "database.php", located in the config directory. (application/config/database.php) This file also contains a lot of explanatory comments, with a large associative array named "$db" at the end. The array can hold the details for more than one database. But only "default" is built out with keys and values.
If you look at the keys, you will notice the four items used when the first connection script was developed: "hostname", "username", "password", and "database". Put in the values for those items.
- The "hostname" needed here is for the MySQL server. MAMP users will use "localhost:8889". XAMPP users will use "localhost:3306".
- The "username" will be "root" for both MAMP and XAMPP users.
- The password is "root" for MAMP users. Leave it empty for XAMPP.
- The database is "ampjam_db".
$db['default'] = array(
	'dsn'	=> '',
	'hostname' => 'localhost:8889',   //'localhost:3306' for XAMPP
	'username' => 'root',
	'password' => 'root',    //leave as '' for XAMPP
	'database' => 'ampjam_db',
	'dbdriver' => 'mysqli',
	'dbprefix' => '',
	'pconnect' => FALSE,
	'db_debug' => (ENVIRONMENT !== 'production'),
	'cache_on' => FALSE,
	'cachedir' => '',
	'char_set' => 'utf8',
	'dbcollat' => 'utf8_general_ci',
	'swap_pre' => '',
	'encrypt' => FALSE,
	'compress' => FALSE,
	'stricton' => FALSE,
	'failover' => array(),
	'save_queries' => TRUE
);
Notice that "mysqli" is the database driver.
routes.php We have already seen "routes.php" with "The WELCOME" project. This time, we need to change the default route to use the controller we will write next. Open "routes.php", located in the config directory. (application/config/routes.php) Look at line 52 and set the value to "litjams".
$route['default_controller'] = 'litjams';
The Controller. It is time to build the first Controller. We will name the controller "Litjams" (Notice the capitalization). Create a new file in the controllers directory. Name it "Litjams.php". Open a PHP tag at the start of the script. It is not necessary to close it. The first line should be:
<?php
defined('BASEPATH') OR exit('No direct script access allowed');
This will prevent direct access of the script. We only want the script called from within the project.
Next, add the line that defines the class, open a curly brace, add a few blank lines, and close the curly brace:
...
class Litjams extends CI_Controller {


}
The capitalization of the file name and the class name must match exactly, and the first letter must be upper case.
Add the "constructor" function. The constructor function will be used to load any models needed, and it triggers the "autoload" feature to load the libraries and helpers set up earlier. The name of the constructor function starts with two underscores (as shown). When you add a constructor function to a class, it is necessary to call the parent class's (CI_Controller) constructor function. There is some strange syntax for this, as you see below. Finally, you should add a line to load a model inside the constructor function:
...
class Litjams extends CI_Controller {
    public function __construct() {
    	parent::__construct();
        $this->load->model('litlist_model');
    }

}
Note: The keyword "public" preceeds the function name inside a class.
The model we are trying to load will be built next, so you will not be able to test the class until the missing pieces are put in place. Continue with the "index" function.
Add the "index" function after the constructor function. The "index" function will run by default if no other method names are used in the URL that calls the controller. Add a "$data" array inside the function, and define the data items we will pass to the view. Last, load the view, (which will be written in a later step), and pass it the "$data" array:
(Litjams.php)
<?php
defined('BASEPATH') OR exit('No direct script access allowed');

class Litjams extends CI_Controller {
    public function __construct() {
        parent::__construct();
        $this->load->model('litlist_model');
    }

    public function index(){
        $data["page_title"] = "AMP JAMS | Lit LIST";
        $data["this_page"] = "litlist";
        $data["records"] = $this->litlist_model->get_litlist_items();
        $this->load->view('litlist', $data);
    }
}
We will take the index function a little further in a later step, but here you see the basics of how a controller functions.
- A model is loaded.
- Data is collected for the view, either as literal values, or by calling a method in the model. The model will contain a method with the name used here. Arguments can be passed to it, if needed.
- The model method will return data, which is stored in the "$data" array.
- Then a view is loaded, and the "$data" array is passed to it.
One more detail before leaving the controller. The Lit LIST page has been written as the index method for the Litjams controller for simplicity. However, we will use this controller again as we build out a site, and the landing page will be used for the index. Make a copy of the index method and name it litlist for later use.
The Model. Put the model in place next. A model is a class, just like the controller, so the script will follow the same format. Create a new file in the models directory. Name it "Litlist_model.php". Just as with the controller, open a PHP tag at the start of the script, add the "No direct accesss" line, create the class, and the constructor function:
<?php
defined('BASEPATH') OR exit('No direct script access allowed');

class Litlist_model extends CI_Model {
    public function __construct() {
        parent::__construct();
        //this causes the database library to be autoloaded
        //loading of any other models would happen here
    }

}
Notice that this class extends CI_Model, instead of CI_Controller. Be sure to close the curly bracket for the class.
Write the method called earlier from the controller now:
(Litlist_model.php)
...
    public function __construct() {
        parent::__construct();
        //this causes the database library to be autoloaded
        //loading of any other models would happen here
    }

    public function get_litlist_items(){
    	$sql = "SELECT * FROM `litlist`";
        $query = $this->db->query($sql);
        return $query->result_array();
    }
}
The get_litlist_items() method creates the query for getting all the list items from the litlist table. However, we do not directly use the mysqli methods for querying the database. Instead, we use CodeIgniter's database library, which has a db object, loaded by the constructor function. The db object has a query method, which takes a query string as the argument.
The query method returns a query object with its own methods for formatting the result:
- $query->result() will produce an array of PHP objects, with the table column names as object properties.
- $query->result_array() will return an array of associative arrays, with table column names for the keys.
We will use the second method and return the result array to the controller.
Here is the complete script for the Model:(Litlist_model.php)
<?php
defined('BASEPATH') OR exit('No direct script access allowed');
class Litlist_model extends CI_Model {
public function __construct() {
parent::__construct();
//this causes the database library to be autoloaded
//loading of any other models would happen here
}
public function get_litlist_items(){
$sql = "SELECT * FROM `litlist`";
$query = $this->db->query($sql);
return $query->result_array();
}
}
A little more here about the db object. CodeIgniter abstracts the database calls, (such as db->query() or $query->result_array()) because CI can use more than one database driver. In the earlier JAMS, we used the mysqli library, and we are using it here, also. But we could be using any of CodeIgniter's drivers, such as PDO. With CodeIgniter, using the higher-level CI functions means that the code does not depend on a particular library. If mysqli should fall out of use in the future (as the mysql library did), CodeIgniter can map the CI database functions to a different library, and things keep moving along.
The View. Create a new file in the views directory called "litlist.php". The view is not a class, so the file name only needs to match the name in the controller that loads the file (it is assumed that the file has a ".php" extension, and is in the views directory). For now, the view just needs to be good enough to make a test and see if things are working.
One detail about the view that needs explanation is that the "$data" array that was passed to the view has been modified so that the view accesses the variables by the key names. That is, $data["page_title"] is now simply $page_title. So let's write a view that just writes the PHP variables to the browser:
(litlist.php)
<!DOCTYPE html>
<html>
    <head>
        <title><?=$page_title?></title>
    </head>
    <body>
        Page Title: <?=$page_title?><br/>
        this_page: <?=$this_page?><br/>
        List items:<br/>
        <?php
            foreach($records as $record){
                echo '
                Item Name: '.$record["item"].'<br/>';
            }
        ?>
    </body>
</html>
Note: To simplify inline PHP syntax, the shorthand version of the PHP tags will be used (<?=$page_title?>). This method shortens the tags, assumes the command is "echo", and does not require the usual semi-colon to end the line.
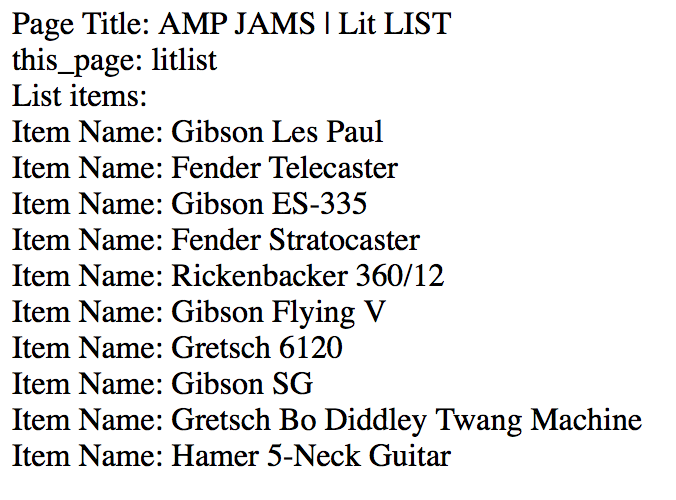
Test this in your browser to be sure things are working so far. You should see plain text output of the text literals, the variables, and the lsiting of the database item names.
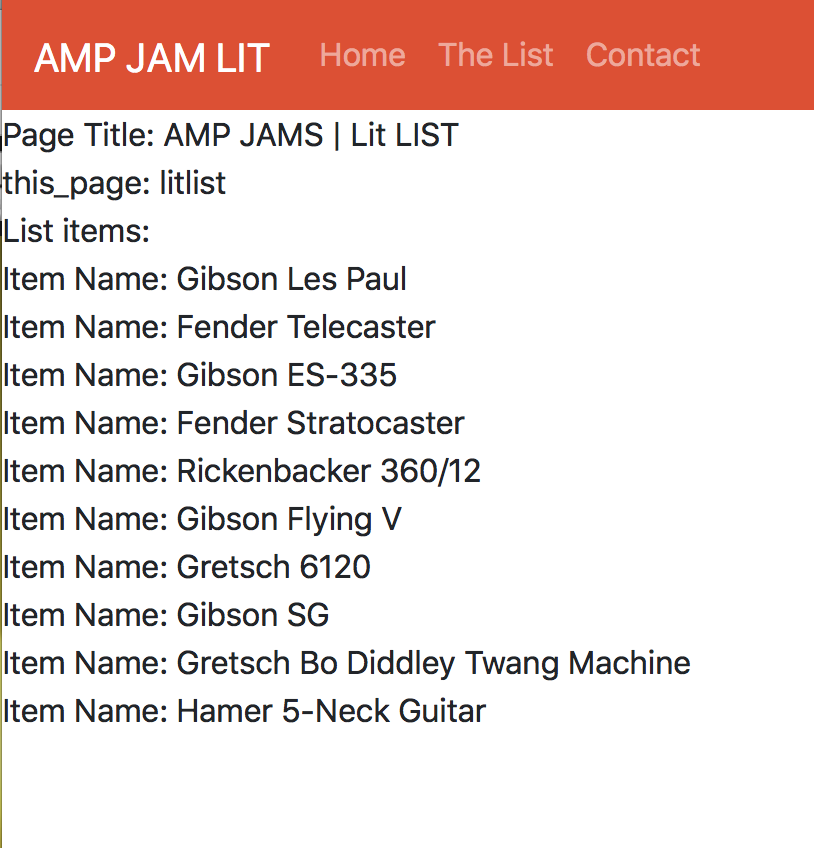
We know enough about using Bootstrap and jQuery that we should be able to take this view much further, and we also expect that we will use this view in a larger site, So instead of putting a lot of effort into making this view look finished as a standalone page, we will set it up to be used as part of a larger site.
The controller can load views in pieces, so we can make a "head" view that functions just as the "include" for head.php worked in the earlier JAMS. Let's start by making a folder within the views directory named templates. Then put a copy of head.php from The SITE into the views folder. This version of head.php will have the Bootstrap/jQuery links and a simple nav-bar, but none of the user account code. We will build those structures later.
Start with the head.php <head> section. Drop in <?=$page_title?> for the <title>, just as you did above.
Next, set the path for the CSS link. The base_url() function will return an absolute path to the project folder. Then add "assets/" to complete the path. Follow a similar pattern for the JS links:
(templates/head.php)
<!DOCTYPE html>
    <html>
        <head>
            <meta http-equiv="Content-Type" content="text/html; charset=UTF-8" />
            <meta name="viewport" content="width=device-width, initial-scale=1, user-scalable=yes">
            <title><?=$page_title?></title>
            <link href="<?=base_url()?>assets/css/bootstrap.min.css" rel="stylesheet">

            <script src="<?=base_url()?>assets/js/jquery-3.4.1.min.js" type="application/javascript"></script>
            <script src="<?=base_url()?>assets/js/bootstrap.min.js" type="application/javascript"></script>
            <script src="<?=base_url()?>assets/js/bootstrap.min.js.map" type="application/javascript"></script>

            <script>
                var this_page = "<?=$this_page?>";
                var page_title = "<?=$page_title?>";

                function navbar_update(this_page){
                    $("#"+this_page+"_item").addClass('active');
                    $("#"+this_page+"_link").append(' <span class="sr-only">(current)</span>');
                }
            </script>
        </head>
Move the code that sets the this_page and page_title variables to the head view, since we no longer need them to be set individually on each page. Just before the navbar_update() function, set the JS vars equal to the PHP values for the page name and title, as you see above.
Leave the navbar_update() function that sets the nav-bar active state as-is. We know what this_page is, because we've just set it. But the timing is bad, since the nav-bar has not been drawn yet. Doing this from the $(document).ready() function is still a good strategy.
Turn your attention to the nav-bar next. Change the nav-bar background color to CodeIgniter orange. The Bootstrap background color classes have a red and a pumkin-orange, but neither are quite right. Instead, let's delete the color utility class ("bg-primary") and use an inline style instead.
Update the "navbar-brand" link with "site_url()" and change the link text to "AMP JAM LIT"
Make the following modifications to the nav-bar:
- The Home Page link should always be the main site link, so use "site_url()" for the URL.
- The "list_item" id should be updated to match $this_page. The controller is sending "litlist" for the page name, so update "list_item" to "litlist_item" and "list_link" to "litlist_link".
- The URL for litlist_link should point to the copy of "index()" you made earlier. The copy was named "litlist()", so the URL should be "<?=site_url()?>/litjams/litlist".
- We have no link for the "contact" page yet, so just use a hash tag for its URL.
(templates/head.php)
...
        <body>
            <nav class="navbar navbar-expand-lg navbar-dark" style="background-color:#ee4323;">
               <a class="navbar-brand" href="<?=site_url()?>">AMP JAM LIT</a>
               <button class="navbar-toggler" type="button" data-toggle="collapse" data-target="#navbarNav" aria-controls="navbarNav" aria-expanded="false" aria-label="Toggle navigation"><span class="navbar-toggler-icon"></span>
               </button>
               <div class="collapse navbar-collapse" id="navbarNav">
                  <ul class="navbar-nav">
                     <li id="home_item" class="nav-item">
                        <a id="home_link" class="nav-link" href="<?=site_url()?>">Home</a>
                     </li>
                    <li id="litlist_item" class="nav-item">
                        <a id="litlist_link" class="nav-link" href="<?=site_url()?>/litjams/litlist">The List</a>
                     </li>
                     <li id="contact_item" class="nav-item">
                        <a id="contact_link" class="nav-link" href="#">Contact</a>
                     </li>
                  </ul>
               </div>
            </nav>
Here is the full script for templates/head.php :
(templates/head.php)<!DOCTYPE html> <html> <head> <meta http-equiv="Content-Type" content="text/html; charset=UTF-8" /> <meta name="viewport" content="width=device-width, initial-scale=1, user-scalable=yes"> <title><?=$page_title?></title> <link href="<?=base_url()?>assets/css/bootstrap.min.css" rel="stylesheet"> <script src="<?=base_url()?>assets/js/jquery-3.4.1.min.js" type="application/javascript"></script> <script src="<?=base_url()?>assets/js/bootstrap.min.js" type="application/javascript"></script> <script src="<?=base_url()?>assets/js/bootstrap.min.js.map" type="application/javascript"></script> <script> var this_page = "<?=$this_page?>"; var page_title = "<?=$page_title?>"; function navbar_update(this_page){ $("#"+this_page+"_item").addClass('active'); $("#"+this_page+"_link").append(' <span class="sr-only">(current)</span>'); } </script> </head> <body> <nav class="navbar navbar-expand-lg navbar-dark" style="background-color:#ee4323;"> <a class="navbar-brand" href="<?=site_url()?>">AMP JAM LIT</a> <button class="navbar-toggler" type="button" data-toggle="collapse" data-target="#navbarNav" aria-controls="navbarNav" aria-expanded="false" aria-label="Toggle navigation"><span class="navbar-toggler-icon"></span> </button> <div class="collapse navbar-collapse" id="navbarNav"> <ul class="navbar-nav"> <li id="home_item" class="nav-item"> <a id="home_link" class="nav-link" href="<?=site_url()?>">Home</a> </li> <li id="litlist_item" class="nav-item"> <a id="litlist_link" class="nav-link" href="<?=site_url()?>/litjams/litlist">The List</a> </li> <li id="contact_item" class="nav-item"> <a id="contact_link" class="nav-link" href="#">Contact</a> </li> </ul> </div> </nav>
To test this, we need to add a line in the controller to load the "head" view. The controller assumes views are in the views folder, but if there is a subfolder, it needs to be added, as shown below:
(Litjams.php)
<?php
defined('BASEPATH') OR exit('No direct script access allowed');

class Litjams extends CI_Controller {
    public function __construct() {
        parent::__construct();
        $this->load->model('litlist_model');
    }

    public function index(){
        $data["page_title"] = "AMP JAMS | Lit LIST";
        $data["this_page"] = "litlist";
        $data["records"] = $this->litlist_model->get_litlist_items();
        $this->load->view('templates/head', $data);
        $this->load->view('litlist', $data);
    }
}
The <head> section and any other HTML in the litlist.php view should removed, down through the opening <body> tag:
(litlist.php)
        Page Title: <?=$page_title?><br/>
        this_page: <?=$this_page?><br/>
        List items:<br/>
        <?php
            foreach($records as $record){
                echo '
                Item Name: '.$record["item"].'<br/>';
            }
        ?>
    </body>
</html>
Test the project now, and you should see that the controller loaded both views, and you should have Bootstrap and jQuery working. If you are seeing trouble (no CSS, PHP errors, etc), check the page in the Web Inspector and make sure the links to the assets folder are correct. If there is a PHP error, the error message should tell you the line number of the error. There may be a typo or similar problem.
Let's make the view look more like list.php from The SITE project. Open list.php and copy the contents into litlist.php.
Delete the PHP section above the <style> tags, leaving the <style> tags at the start of the script. Change the headline from "Dinosaurs Top 10 List" to "LIT Top 10 List".
Inside the foreach loop, make the following changes:
- The rows will need a little more space this time, so change the "mt-3" class to "mt-5" for more margin-top.
- Give the image column a wider space, so change the "col-2" class to "col-3".
- Insert base_url() into the "src" URL. This line is already in PHP, so the syntax will be a little different here. Break the "echo" string with single quotes, then use dots to concatenate the base_url() function into the string. (See the script below.)
- Insert "assets/" into the URL path.
(litlist.php)
    <style>
        .cursor-pointer {cursor:pointer;}
    </style>
    <div class="container-fluid">
        <div id-"headline" class="row mt-5">
            <div class="col-12 text-center">
                <h2>LIT Top 10 List</h2>
            </div> <!-- /.col-12 -->
        </div> <!-- /.row -->
        <?php
            foreach ($records as $record){
                echo '
                <div class="row record-item mt-5 cursor-pointer" data-id="'.$record["id"].'" data-item="'.$record["item"].'">
                    <div class="col-1"></div>  <!-- spacer -->
                    <div class="col-3"><img src="'.base_url().'assets/images/'.$record["image"].'" width="100%"/></div>
                    <div class="col-7"><b>'.$record["item"].'</b> '.$record["description"].'</div>
                </div>  <!-- /.row -->';
            } //foreach
        ?>
    </div> <!-- /.container-fluid -->
</body>
<script>

    $(document).ready(function(){
            document.title = page_title;
            navbar_update(this_page);

            $(".record-item").on("click", function(){
                var id = $(this).data('id');
                show_detail(id);
            }); //on()
    }); //document.ready

    function show_detail(id){
        window.location.assign("<?=site_url()?>/litjams/detail/"+id);
    }
</script>
</html>
Last, update the Javascript at the end of the script. Remove the JS variables for "this_page" and "page_title", since these are now being set in the <head> section.
Next, update the URL for "window.location.assign()" in the show_detail() function.We need to call the "Litjams" controller and call a method we have not yet written. We will name it "detail", and we will pass it the ID for the item we want. Use inline PHP to call site_url(), then add /litjams/detail (all lower case). Close the double quote and add +id outside the quotes.
The result is that the URL will have 3 segments following "index.php". CodeIgniter will interpret the first segment as the controller. The second segment will be a method, and the third segment will be an argument for the method. (We will write that next.)
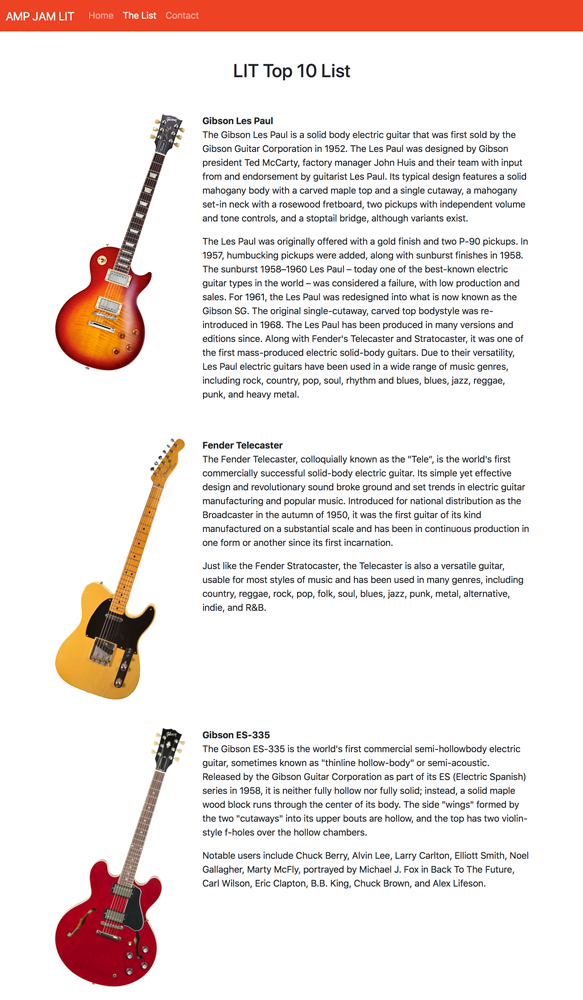
But first, test what you have in your browser to see whether everything is working. It should look like the screenshot on the right. Clicking on the items will give you a 404 Not Found Error, because we have not built the detail page. But try it and notice the URL that is generated. The MAMP version should look like this:
http://localhost:8888/n413_litlist/index.php/litjams/detail/1
XAMPP users will not have the ":8888".
The Detail Page Adding a new page starts with the controller. A new method is added called "detail", and it will have an argument for the $id. The method will call the model for its data, using a new method that will be added to the model. The model data will be passed back to the controller and then passed to a new view, which will be created. Let's start with the controller.
The new controller method will look like this:
(Litjams.php)
...
    public function detail($id){
        $detail = $this->litlist_model->get_litlist_detail($id);
        $data["page_title"] = "AMP JAMS | ".$detail["item"];
        $data["this_page"] = "litlist";
        $data["row"] = $detail;
        $this->load->view('templates/head', $data);
        $this->load->view('detail', $data);
    }
...
The $id value is passed to the detail() function from the third URL segment. It is then passed to the model method (get_litlist_detail($id)) as an argument.
The new model method will look like this:
(Litlist_model.php)
...
    public function get_litlist_detail($id){
    	$sql = "SELECT * FROM `litlist` WHERE id = '".$id."'";
        $query = $this->db->query($sql);
        return $query->row_array();
    }
...
The $id value is used in the SQL query to get the desired row.
The model method uses a CodeIgniter function called row_array(). This will return the first row formatted as an arrray. If no row exists, it will return NULL.
For the view, start with detail.php from The SITE project.
Delete all the PHP code at the beginning of the script, down to the "container-fluid" div. Then make the following modifications inside the "foreach" loop:
- Insert "base_url()" into the "src" URL.
- Add "assets/"into the path after "base_url()".
- Change the column width for the image to "col-4"
- Change the column width for the text to "col-6"
- Remove the "h3" and "text-muted" classes for the description.
Add "mb-5" (margin-bottom) to the row that contains the button, and replace the link URL with "<?=site_url()?>/litjams/litlist". This URL points to the "litlist" method in the controller:
(views/detail.php)
<div class="container-fluid">
        <div id-"headline" class="row mt-5">
            <div class="col-12 text-center">
            <?php
               if($row){
                   echo '<h1>'.$row["item"].'</h1>';
               }else{
                   echo '<h2>There has been a database error.</h2>';
               }
            ?>
            </div> <!-- /.col-12 -->
        </div> <!-- /.row -->
        <?php
            if($row){
                echo '
                <div class="row mt-3">
                    <div class="col-1"></div>  <!-- spacer -->
                    <div class="col-4"><img src="'.base_url().'assets/images/'.$row["image"].'" width="100%"/></div>
                    <div class="col-6">'.$row["description"].'</div>
                </div>  <!-- /.row -->';
            }
        ?>
        <div class="row mt-4 mb-5">
            <div class="col-12 text-center">
            	<a href="<?=site_url()?>/litjams/litlist"><button class="btn btn-primary">Back to The List</button></a>
            </div> <!-- /.col-12 -->
        </div> <!-- /.row -->
    </div> <!-- /.container-fluid -->
</body>
</html>
Here is the finished Controller script:
(controllers/Litjams.php)
<?php
defined('BASEPATH') OR exit('No direct script access allowed');

class Litjams extends CI_Controller {
    public function __construct() {
        parent::__construct();
        $this->load->model('litlist_model');
    }

    public function index(){
        $data["page_title"] = "AMP JAMS | Lit LIST";
        $data["this_page"] = "litlist";
        $data["records"] = $this->litlist_model->get_litlist_items();
        $this->load->view('templates/head', $data);
        $this->load->view('litlist', $data);
    }

    public function litlist(){
        $data["page_title"] = "AMP JAMS | Lit LIST";
        $data["this_page"] = "litlist";
        $data["records"] = $this->litlist_model->get_litlist_items();
        $this->load->view('templates/head', $data);
        $this->load->view('litlist', $data);
    }

    public function detail($id){
        $detail = $this->litlist_model->get_litlist_detail($id);
        $data["page_title"] = "AMP JAMS | ".$detail["item"];
        $data["this_page"] = "litlist";
        $data["row"] = $detail;
        $this->load->view('templates/head', $data);
        $this->load->view('detail', $data);
    }
}
Here is the finished Model script:
(models/Litlist_model.php)
<?php
defined('BASEPATH') OR exit('No direct script access allowed');

class Litlist_model extends CI_Model {
    public function __construct() {
        parent::__construct();
        //this causes the database library to be autoloaded
        //loading of any other models would happen here
    }

    public function get_litlist_items(){
    	$sql = "SELECT * FROM `litlist`";
        $query = $this->db->query($sql);
        return $query->result_array();
    }

    public function get_litlist_detail($id){
    	$sql = "SELECT * FROM `litlist` WHERE id = '".$id."'";
        $query = $this->db->query($sql);
        return $query->row_array();
    }
}
The Lit LIST is done! You have built an MVC Full Stack application. It would be good to take a few minutes to review how the flow of the application works. It all starts with the Controller. The Controller accumulates the data needed, calling the Model for any data needed from the database. The Model fetches the requested data, and returns it to the Controller. The Controller then loads the View (or Views), passing the data to the View. The View renders the page view in the browser, using the data.
Plus, you've gotten an introduction to CodeIgniter, explored the setup, built a couple of classes, and learned a little about the special CodeIgniter functions that help with URLs and database queries.
The next step is to explore how we would write data to the database. Let's build the Lit FORM next, using AJAX to send the form data.
Completed Project. You can open a completed version of the project in your browser here. Here are completed versions of the scripts used for this project:
If you want to download completed versions of the PHP scripts and image files, you can find them here.(controllers/Litjams.php)
(models/Litlist_model.php)
(views/templates/head.php)
(views/litlist.php)
(views/detail.php)
Move ahead to the Lit FORM when you are ready to go!