The Web4 Page. General information about Web4, how to get an account, what it is, why to use it, etc.
Web4 URL:
https://in-info-web4.informatics.iupui.edu
Web4 URL to your site:
https://in-info-web4.informatics.iupui.edu/~<your-CAS-username>/<your-project-path>
Note the tilde ('~') character before the user name.File Transfer on Web4. General setup information for SFTP.
Using phpMyAdmin on Web4. Access to MySQL databases on web4.
The web4 server is available for SOIC students who need server resources for their courses. Accounts for web4 are usually set up each semester based on course rosters, but there is no formal process for this. If you need web4 account access, check to see whether you are able to log on with File Transfer access and/or phpMyAdmin access. If you are not able to log on, ask your instructor to request an account for you.
Web4 accounts are not necessarily persistent from one semester to the next, so be sure to keep your own copies of any files or databases you have on web4.
Credentials. Web4 access for File Transfer (SFTP) is only available from campus IP addresses or through a VPN (Pulse Secure). The initial log-in for web4 uses Central Authentication System (CAS) credentials. Use these for SFTP log-ins and for web browser access to phpMyAdmin.
In addition, phpMyAdmin/MySQL requires another set of credentials for database access. These credentials can be found in a file inside the root directory of your account. The file name will be <your-CAS-username>-mysql-password. Inside this file you will find the database credentials for MySQL, including the database name, the database username, and the database password. The database username will be the same as your CAS username. The database name will be your CAS username with "_db" added. The password is a random string of words.
Connection Scripts. Connection scripts and config files should use the credentials detailed above:
- Database name: <your-CAS-username>_db
- Database user: <your-CAS-username>
- Password: <password from credentials file>
- Database host: localhost
Note: "localhost" is not followed by a port name on web4.
CodeIgniter Projects. Edit the config and database files for CodeIgniter projects to move them to web4.
- Copy your config/config.php file and change the base_url property to
https://in-info-web4.informatics.iupui.edu/~<your-CAS-username>/<project folder>/
Note the trailing slash.
- Copy the config/database.php file and edit the database name, user, password, and host as you see above for connection scripts.
Moving Projects to Web4 When moving projects to web4, you should always use a project folder to contain your files and keep the project files separated form other projects. Use the modified connection scripts and/or config files as described above in your web4 project.
Databases. Databases present a special problem when moving to web4. In your localhost development environment, you had the option to create as many databases as needed. On web4, you have one database. So it is important to find a way to keep the tables from one project from colliding with the tables from a different project. The best way to do this is by "namespacing", or using prefixes to the table names that keep them unique. For example, the tables for The FORM project might have a prefix of "n413_form_". This avoids having an older project break because the database tables it uses are modified. Unfortunately, any SQL scripts in the project will need to be updated with the new table name. For this reason, if you expect to move the project to web4, you should consider the namespace issue from the outset, and use the namespaced table names in your localhost development environment.
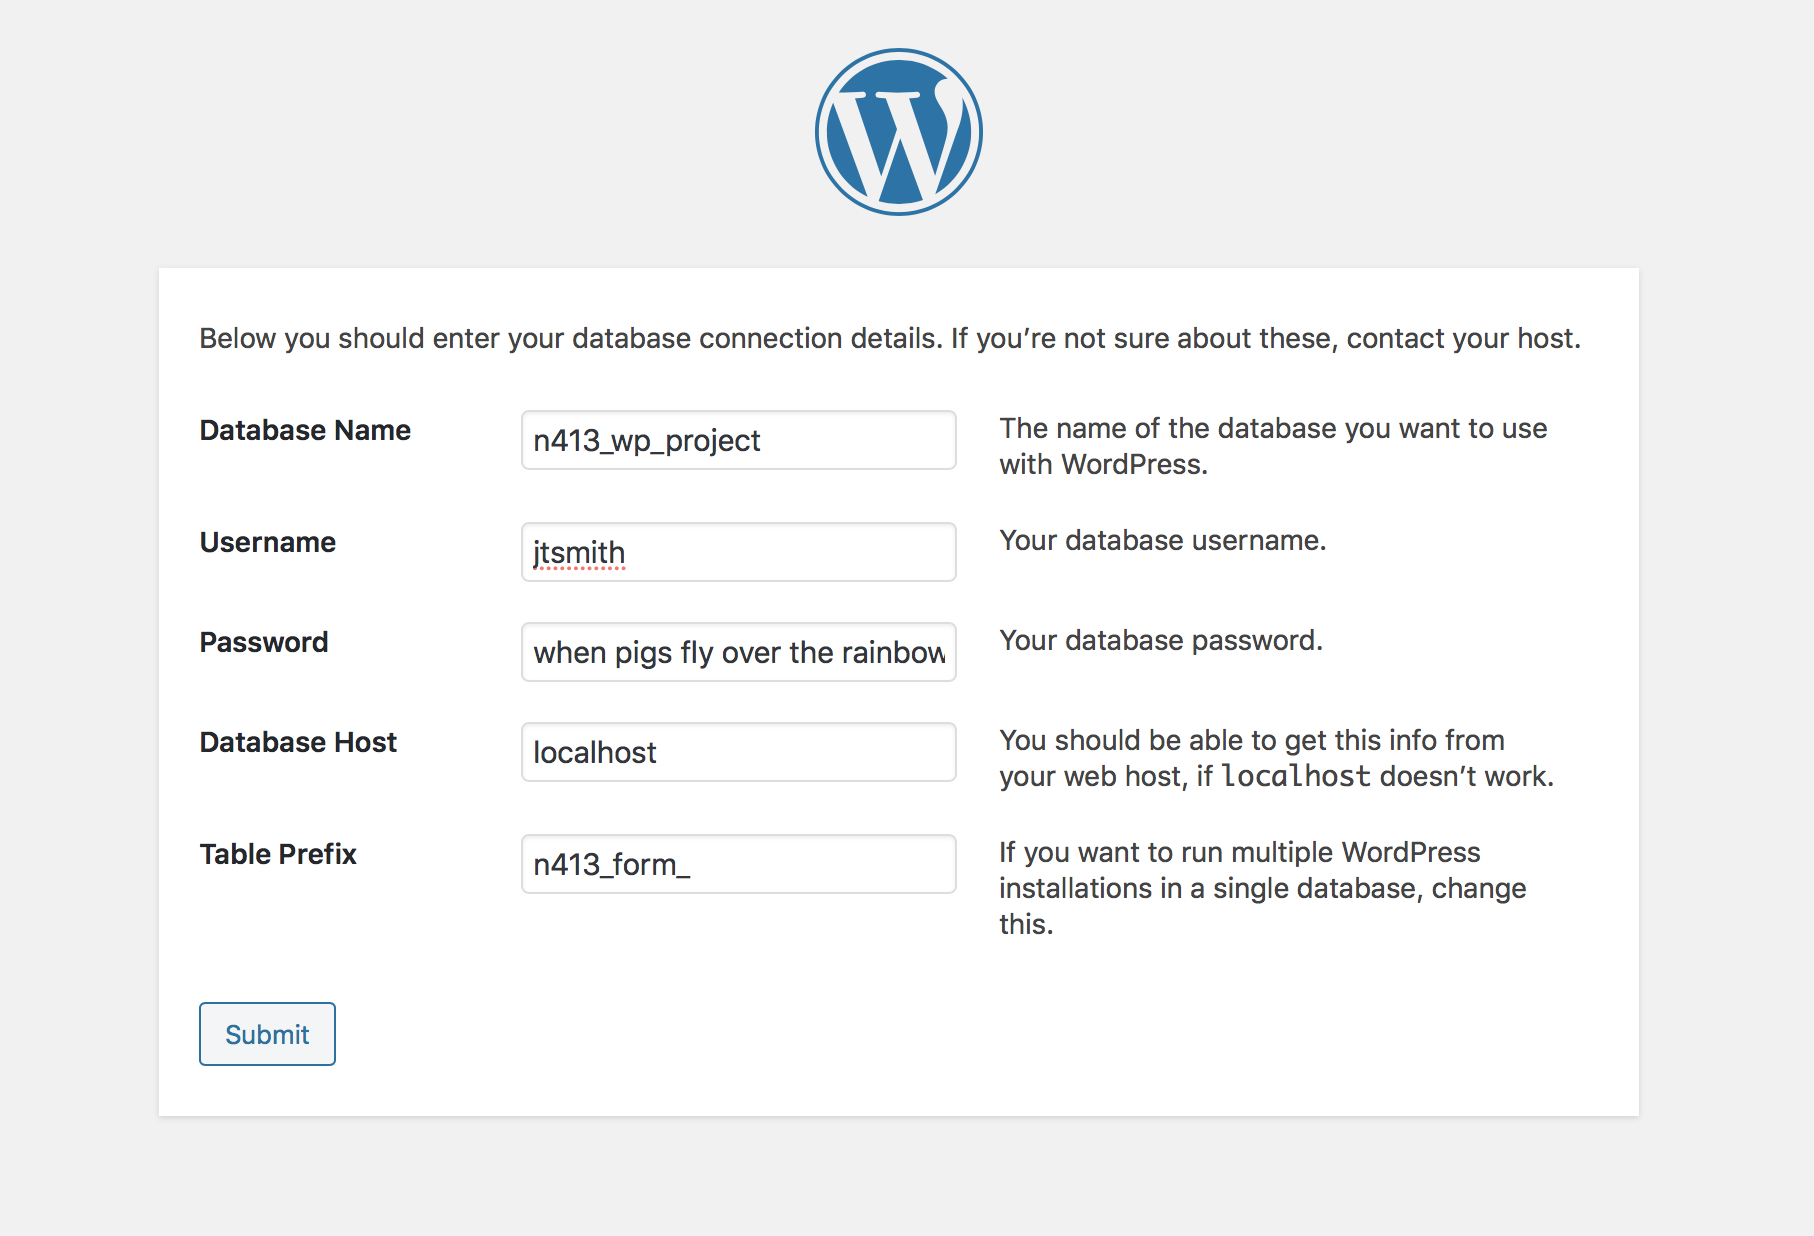
Moving WordPress projects. Moving a WordPress project is sometimes tricky. Wordpress keeps some details about the environment where it is installed stored internally. For this reason, it is usually better to install a fresh set of WordPress files on web4 and modify the new install, rather than moving the files from your localhost environment. When you do a new WordPress install, it will ask for the database credentials as part of the install. Also, it will ask you about prefixing the database table names (see above and illustration at right). Use the table prefix option to keep WordPress projects separated from each other, since you are using the same database for all your projects on web4.
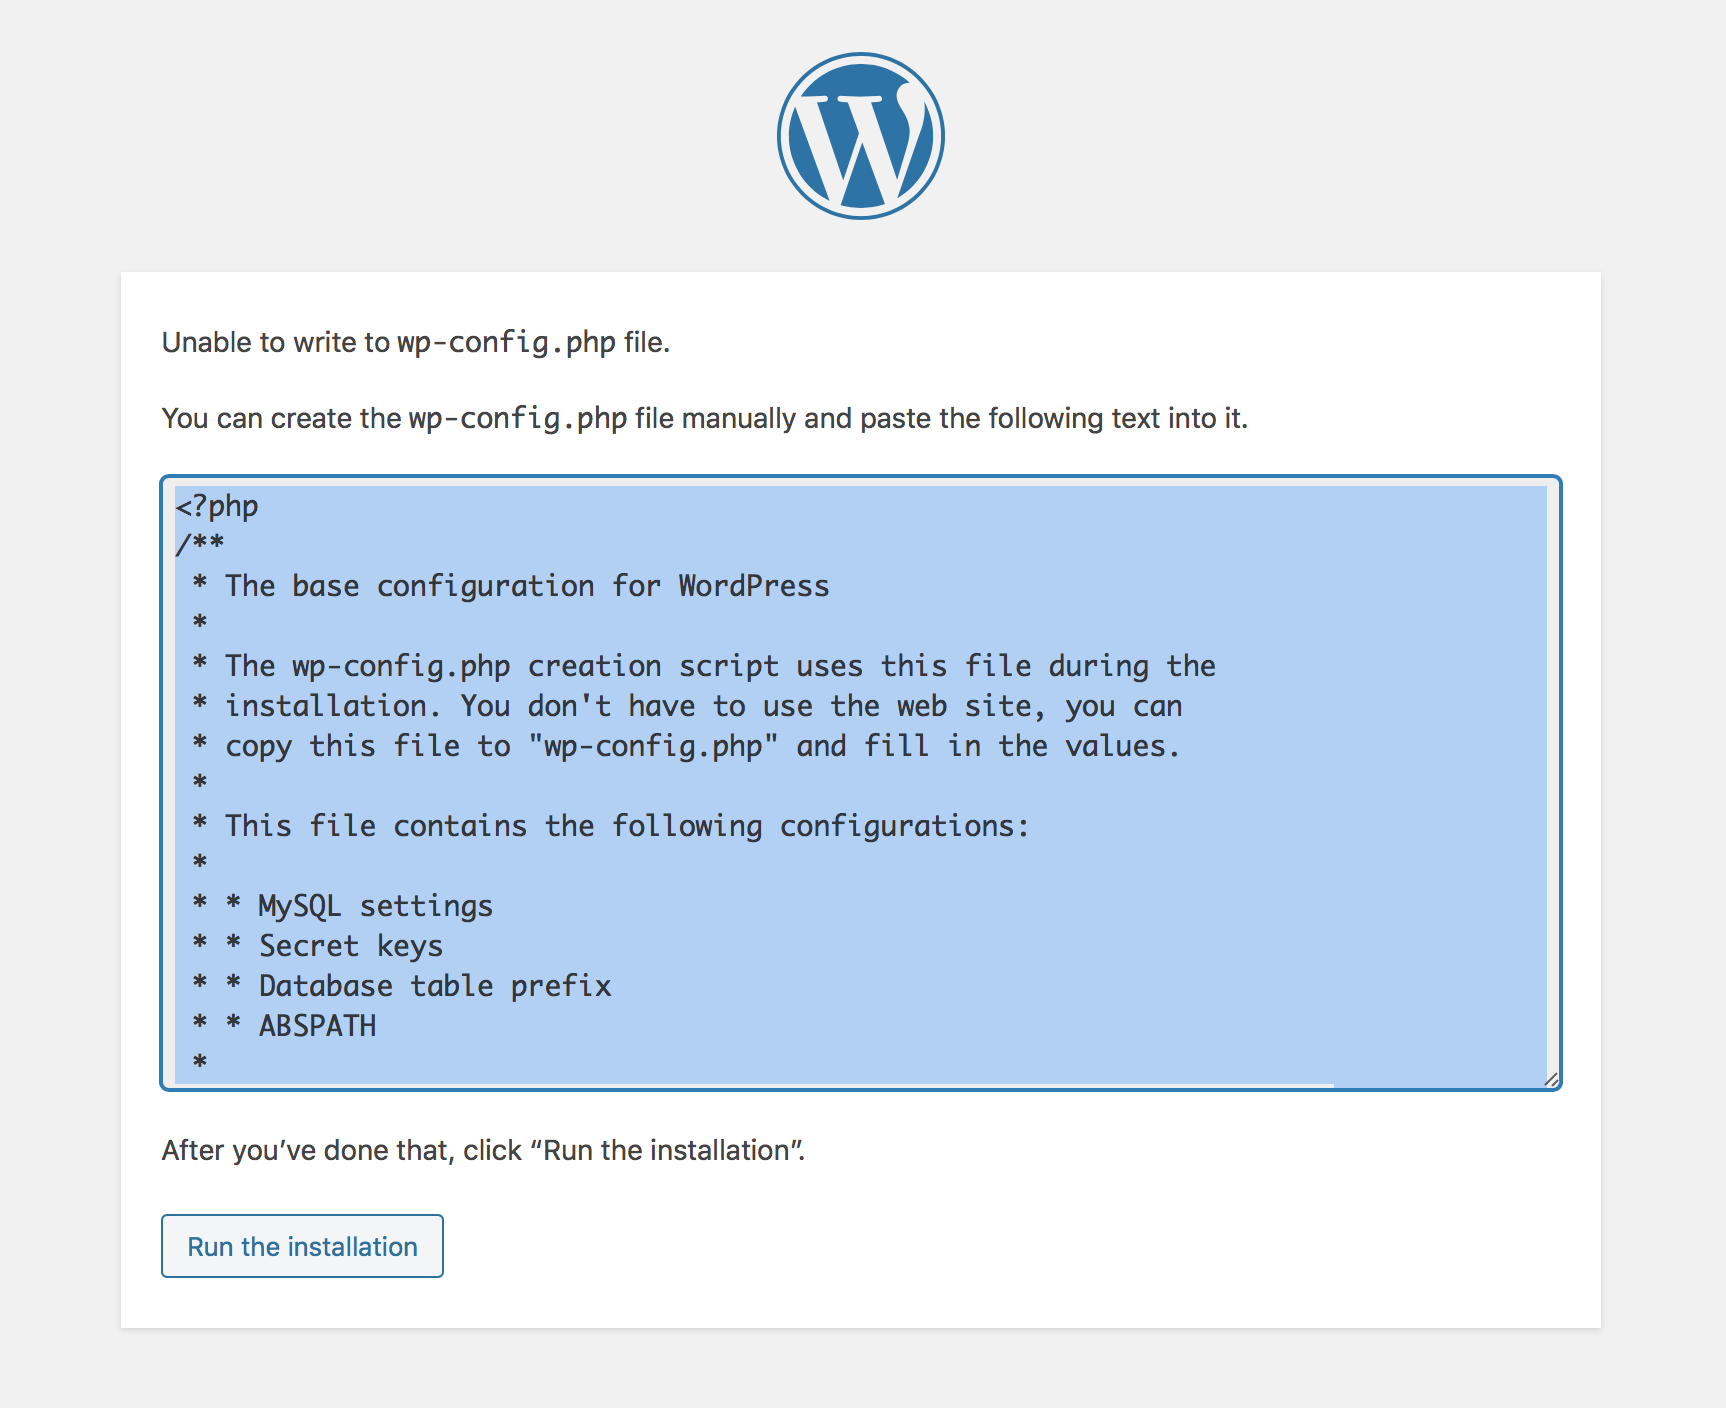
Once you enter all the setup details in the install step, Wordpress will try to use them to modify the wp-config.php file. This may not be possible on web4, due to server permissions. In that case, Wordpress will write the wp-config.php file into a text box, and you can copy-paste the contents into a new wp-config.php file. You can then upload the new wp-config file to web4 using SFTP.
The next step is to move any graphics or child-theme files to web4. It is usually simplest to upload your entire wp-content directory to web4, overwriting the new install's wp-content directory. Alternately, you can go into the wp-content directory and upload the uploads folder (graphics), plug-ins, themes, and child-theme folders individually.
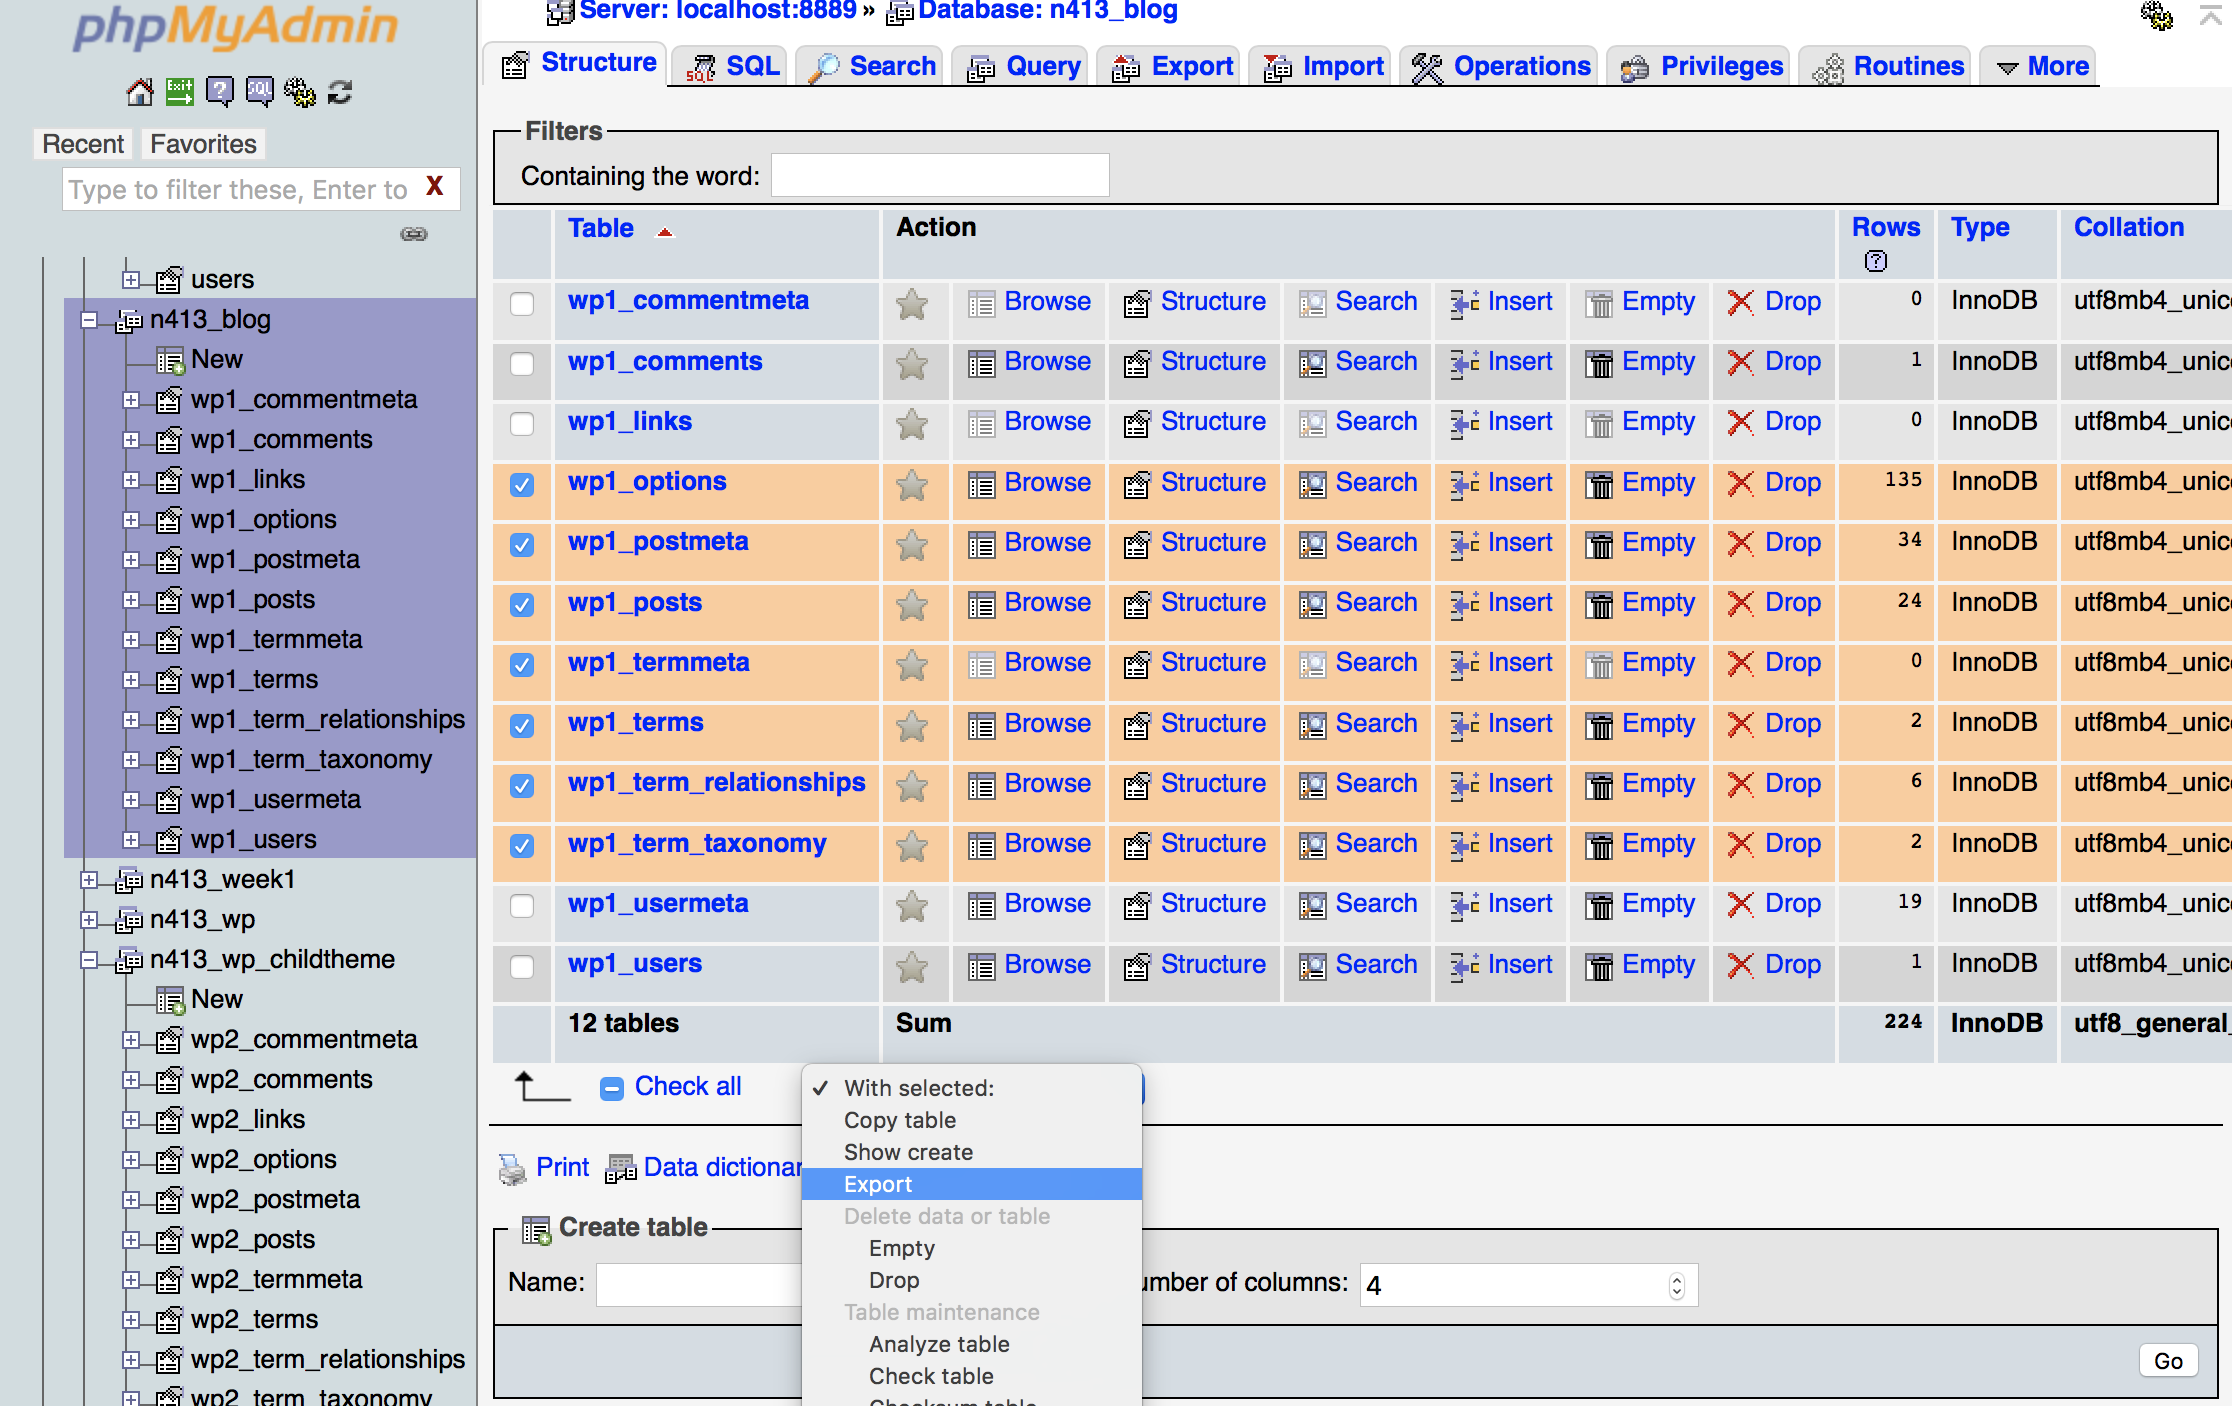
Now you are ready to move your database tables to the web4 database. Export the tables you need to move from your loclahost setup. Edit the SQL script to update any table name differences due to namespacing on web4. Also see the wp-options table information about the siteurl and home records. Drop the tables from the web4 install database, and paste the Export SQL scripts in the web4 phpMyAdmin SQL window to run them.
You only need to move tables with records in them. If you have records, the tables you need to move are:
- wp_options You only need to move wp-options if you have modified the theme components using the Admin interface (background colors, menus, footers, sidebars, font options, etc.). The first two records in the web4 install's wp-options table need to be the new siteurl and home URLs. (These should be the same.) Update the records in your exported table script with the web4 install's URLs.
- wp_postmeta
- wp_posts
- wp_termmeta
- wp_terms
- wp_term_relationships
- wp_term_taxonomy
If you are the only user for the WordPress project, you don't need to move the wp_usermeta or wp_users tables, as you have already set them up with the web4 install. If you have additional users, copy these two tables to keep users, passwords, permissions etc. in place.
Last, check to see that your themes, plug-ins, widgets, and other settings made in the Admin interface are working properly. If not, use the Admin interface to activate them for the new install. Your Wordpress site should now be working on web4.