The HIERARCHY will look at the template hierarchy -- a logic tree that determines which PHP file template WordPress uses to display a page. Then we will take a template file from the theme, copy it to the child theme, and modify it in some way.
WordPress has a system of template files that are set up to display the content in various ways. The most apparent example of this is the "blog" page, which shows all the posts. If you want to modify the way the posts are displayed, how do you find the right template file to change? Or maybe create a special template file for that one unique case? That's where the template hierarchy is your guide. Keep reading to see how the template hierarchy points the way to understanding template files.
This project has the following steps:
- Either set up a new WordPress site or work with the one that you set up in one of the earlier projects.
- Activate a WordPress theme that uses template files. The themes included with WordPress version 5.8 or earlier (Twenty Twenty-One) will work, or you can continue with Twenty Twenty. The instructions and illustrations are for Twenty Twenty. Don't use Twenty Twenty-Two. Twenty Twenty-Two uses template blocks, not template files.
- Create a child theme for the theme and activate it.
- Use the template hierarchy diagram to find how a particular type of content will be routed to a template.
- Categorize some posts and observe the way your theme draws them to the screen.
- Customize a template and see how the template file name is used by WordPress to display different types of content.
Project Set-up. You can continue working with any of the WordPress sites you set up previously, or you can start a new site. If you start a new site, I recommend naming it n413_template. The instructions will assume you are using a new project. Set up a new database and do a fresh install of the Wordpress files, as explained in The INSTALL. Be sure to namespace the table names if you are adding this project to a database that already contains other projects.
Twenty Twenty or Twenty Twenty-One...? Even though the instructions and illustrations describe Twenty Twenty, you simply need a theme that uses template files for drawing categories, which is usually archive.php. In many themes, this is index.php. This should include just about any theme you can find, excepting the new "block" themes, such as Twenty Twenty-Two -- "block" themes use blocks for the templates. (If you have the Twenty-Twenty-Two theme, check out the contents of its index.php file.) Look in the theme folder for archive.php to note which way the categories are drawn, then activate the theme. Create a front page, as you did in The BLOG and add a few blog posts now.
If you need the theme files for either the twentytwenty theme, or the twentysixteen theme, you can find them on the Resources page.
Child Theme. Create a new child theme, just as you did for The CHILD. You will need to modify the style sheet header to point to the parent theme directory. The header should look like this, but substitute the correct parent theme name for the theme you have selected.
/*
Theme Name: Twenty Twenty Child
Theme URI: http://www.example.com/
description: >-
  A child theme for Twenty Twenty and the N413/AMPJAM Project
Author: <your name>
Author URI: http://example.com
Template: twentytwenty
Version: 1.0.0
License: GNU General Public License v2 or later
License URI: http://www.gnu.org/licenses/gpl-2.0.html
Tags: archive page
Text Domain: twenty-twenty-child
*/
/* Custom CSS goes after this line */
Borrow the index.php file from the parent theme directory, and create the functions.php file just as you did for The CHILD. You can copy the functions.php file from that project into this one.
It should look like this:
<?php
function enqueue_parent_styles(){
    wp_enqueue_style('parent-style', get_template_directory_uri().'/style.css');
    wp_enqueue_style('child-styles', get_stylesheet_directory_uri().'/style.css');
}
add_action('wp_enqueue_scripts', 'enqueue_parent_styles');
Be sure to activate the child theme in the Wordpress dashboard.
Template Hierarchy. When you link to a page in WordPress, whether that is a blog, a category listing of posts, a custom page, or a single post, WordPress first generates a query. (Note: To be more specific, this is a WordPress $wp_query object, a PHP "global" variable, which is then translated into a MySQL query.) The query returns a complex result that contains a lot of information about the page to be rendered, the type of post, the number of posts, and the post content.
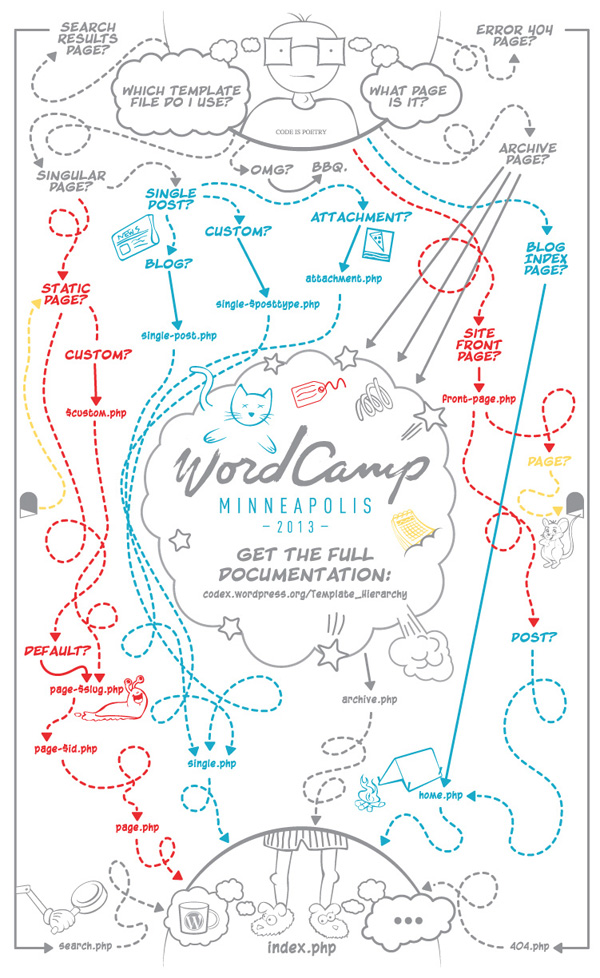
The query result is then passed to the theme, which contains PHP code for rendering the content to the browser. There is a logical tree for selecting which PHP file is used by the theme to display the query's content. This is called the "Template Hierarchy".
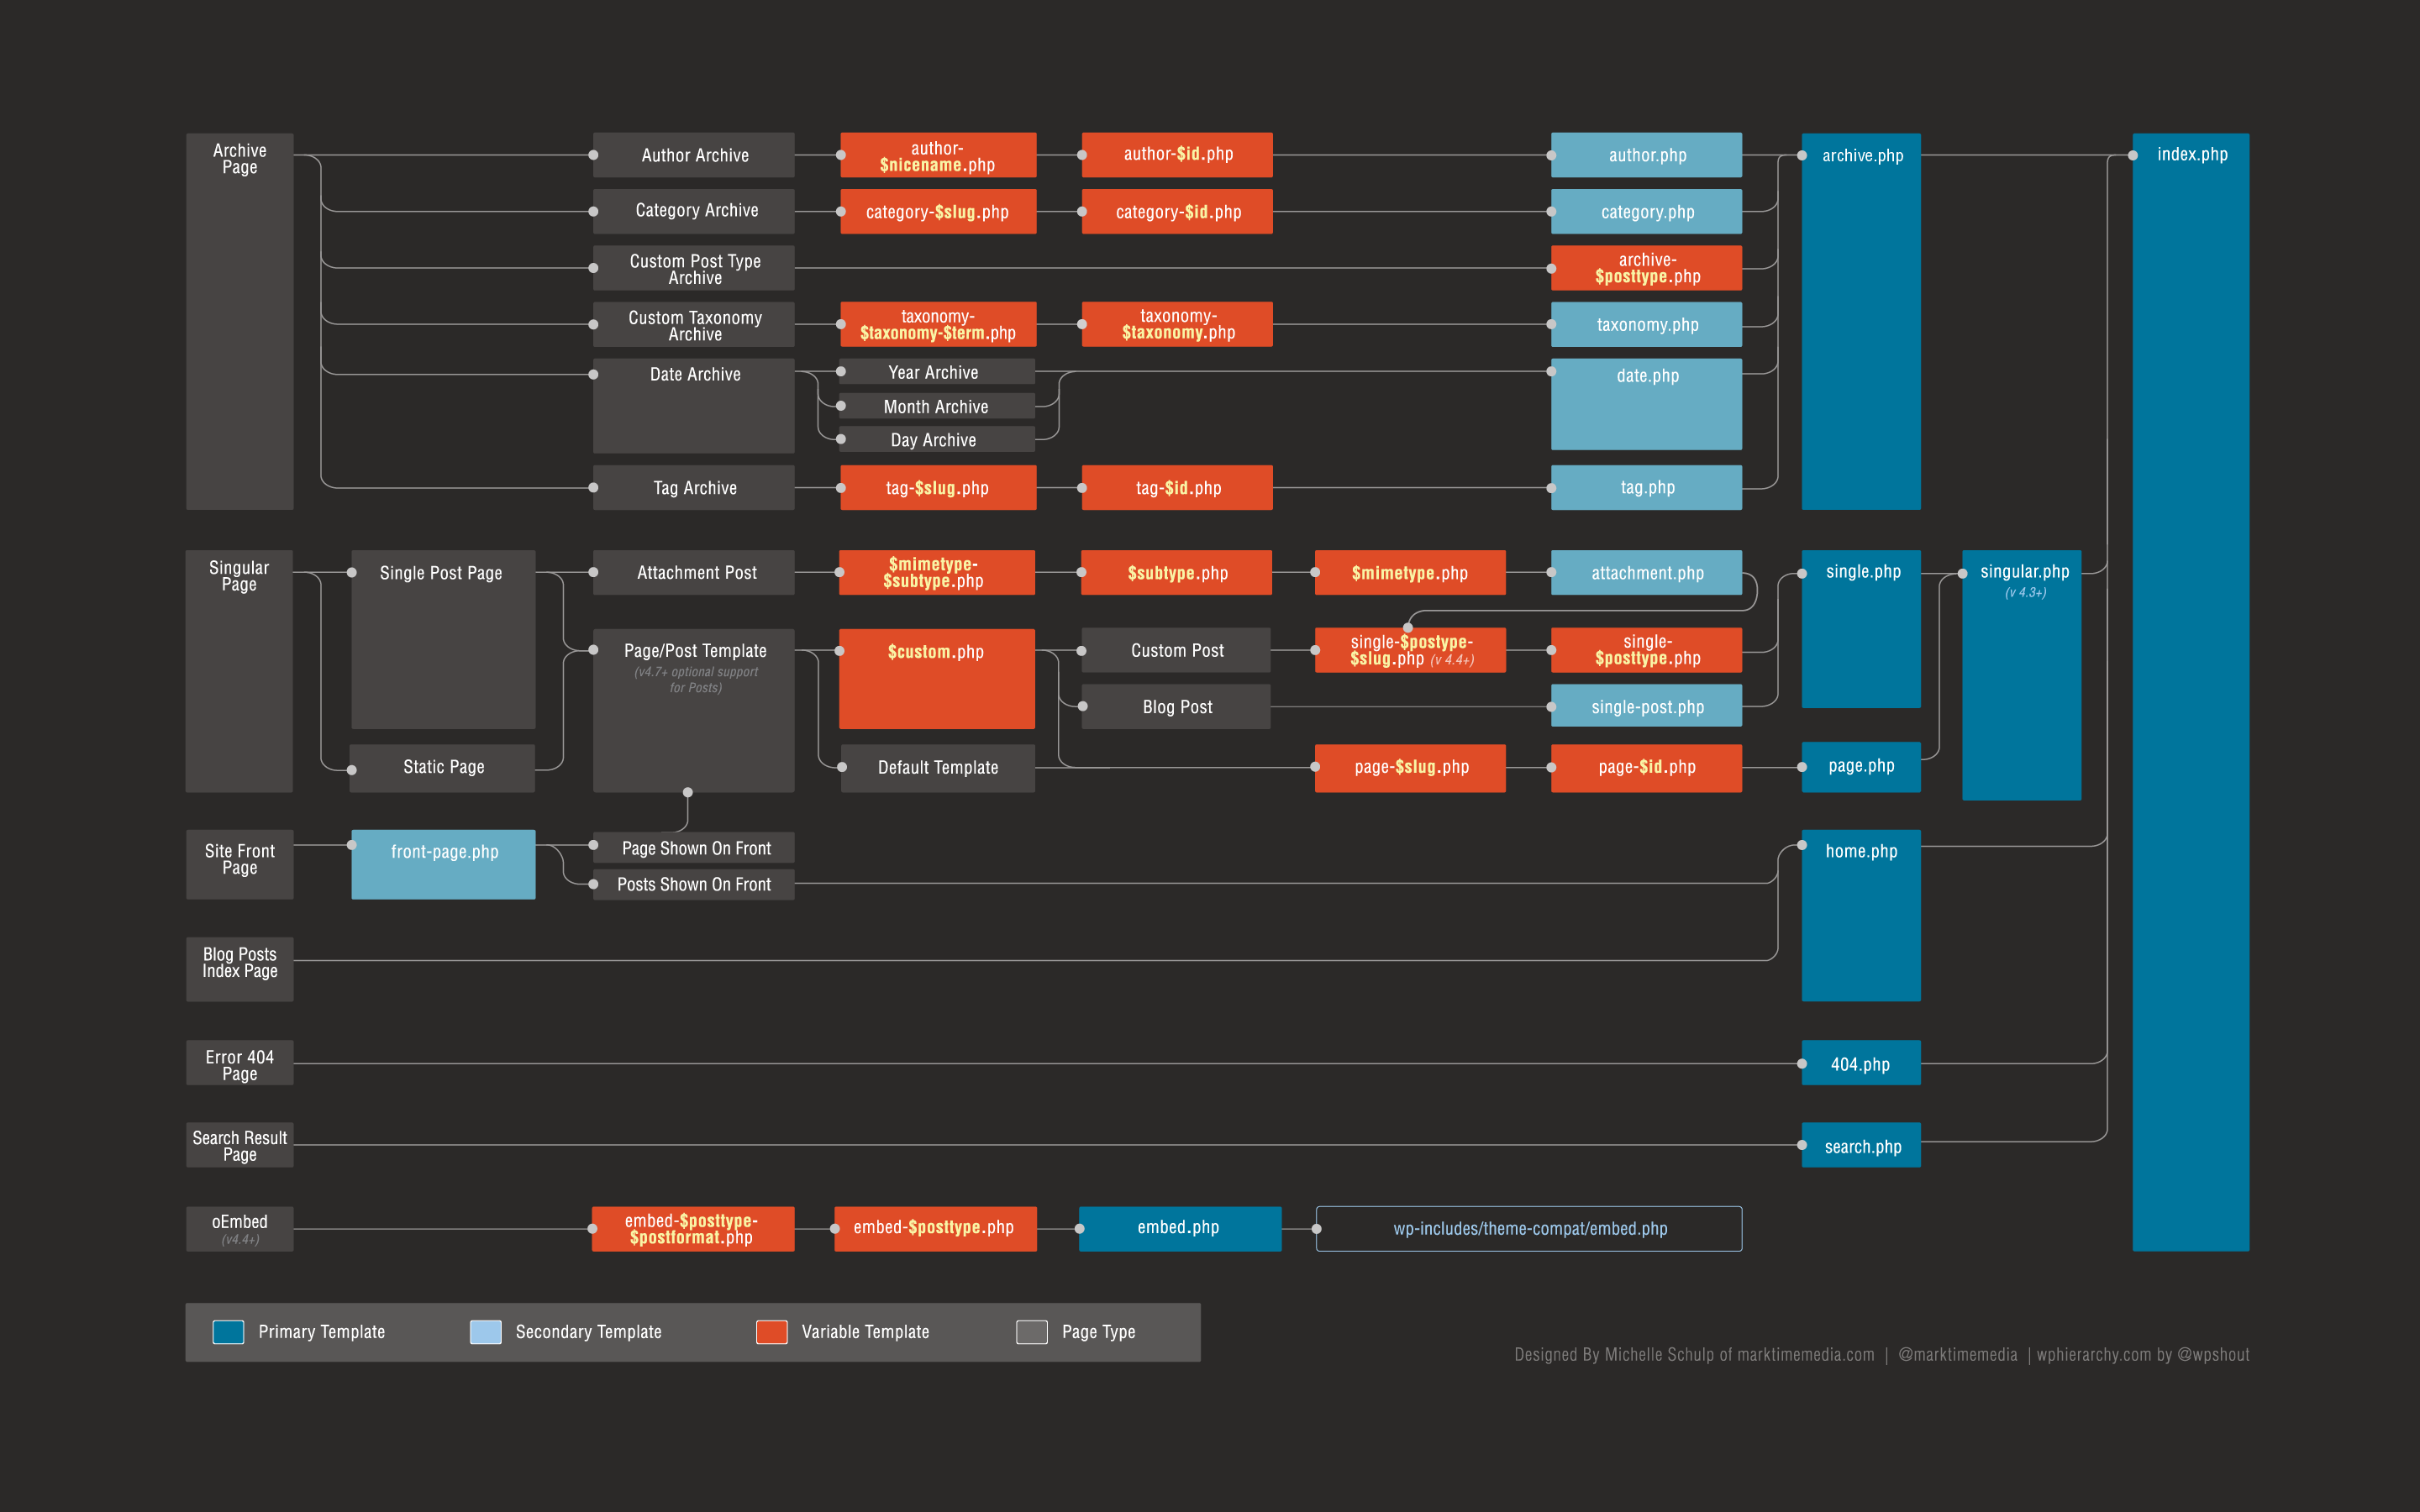
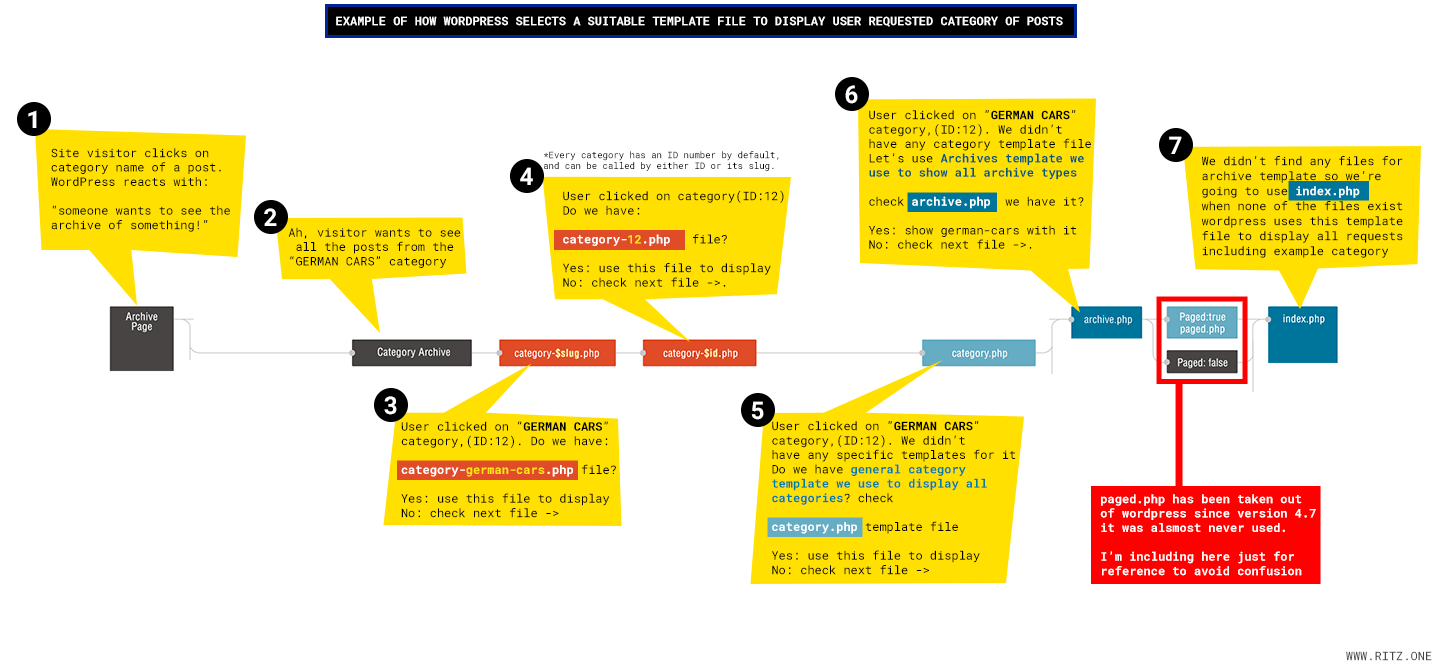
The Template Hierarchy is an intimidating chart to view, but it is actually quite useful if you want to know which template in a theme will render a particular kind of content. For example, if you want to display a listing of category posts look at the chart to find "Category Archive", follow the line to the right, and you will see that there is a hierarchy of PHP file names that will be selected for that type of content. The first two potential selections will be files named "category" with a specific "slug" (category name) or id (the category's id number) appended to the file name. If neither of those files are found, WordPress will loook for "category.php". If "category.php" does not exist, WordPress will look for "archive.php". The last resort for any content type is "index.php", which is why any theme or child theme must contain an "index.php" file. Have a look inside the Twenty Twenty theme directory to see what files are listed there. You will see that Twenty Twenty does not have a "category.php" file, or an "archive.php" file. So any category listings would be drawn with "index.php".
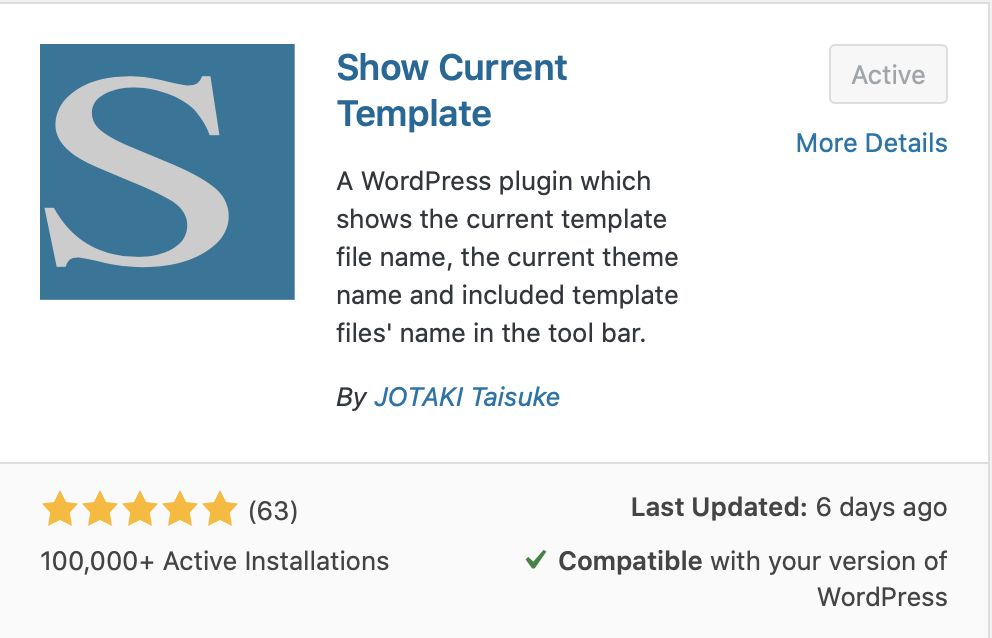
Show Current Template A very useful tool for learning about templates is the "Show Current Template" plug-in. It displays the current page template on the WordPress Toolbar at the top of the screen as you are viewing a page. To install it, go to the Dashboard, select Plugins from the left-side menu, and click "Add New". Enter "Show Current Template" in the search bar and install/activate it. With the Show Current Template tool in place, browse around your site and notice which template pages are being used for various screens. Compare what you see with template hierarchy chart.
With the Twenty Twenty theme, you may not see many templates being used besides index.php. So let's make an archive.php file to display the Blog. You could just copy the index.php file and rename it "archive.php", but the Twenty Sixteen theme is an older theme that contains an "archive.php" template. Twenty Sixteen's "archive.php" file is easier to customize, so locate a Twenty Sixteen "archive.php" file and drop it into your child theme folder. You may need to Install Twenty Sixteen from the Dashboard's Appearance>Themes section.
Note: Moving template files from one theme to another can cause problems with page markup. WordPress uses templates for headers and footers, as well as the main sections of the page (which could include sidebars). Theme designers decide where to place opening and closing tags for the page content containers, and they might be placed in any of the templates. This varies between themes, so check any templates you move between themes for problems with the way the tags are distributed among the templates. For main templates, if all the tags that are opened in the template are also closed, you should be OK. Headers should have opened tags matched in the footer. Otherwise, you may need to revise the markup. See The LOOP.
Once you have a copy of the file, check the Blog to see which template is being shown on the toolbar. You should see index.php. Now, drop archive.php into the child theme folder. Reload the blog, and you should see archive.php displayed as the template. You will also see some style changes coming from the Twenty Sixteen theme.
Make some Categories. From the WordPress dashboard, Choose Posts > Categories from the left side menu. Use the "Add New Categories" interface to create a few categories. If you haven't made any blog posts, make several now.
If you are creating a post, look at the right-side panel, and be sure the top-most "Post" setting is selected. (If you don't see the right-side panel, click the Setings "gear" icon at the top of the screen). There will be a section labeled "Categories" about halfway down the screen. Click it, and you will see checkboxes for the categories you have created.

For posts you have already created, use the "Quick-Edit" feature. Go to the Dashboard and click the "Posts" item in the left-side menu. When you mouse over the post listings, you will see options for editing the post, including "Quick Edit". This will open an interface that provides check-boxes for the categories.
Organize your posts into at least two categories. Then view your site and look around to see if the category names are displayed somewhere on the pages. Most themes will display categories in sidebars or at the bottom of the pages. Find the category links, and click them. You will see the posts for that category displayed in the way "archive.php" script is set to display them.

Customize "archive.php". Let's customize "archive.php" so you can see how this works. Start by copying "archive.php" from the Twenty Sixteen theme folder to your child theme folder -- or just copy index.php and rename it. Now open the child theme's "archive.php" and add a headline that says: "AMP JAM Archive Template".
Start by looking for a good place to put the headline. Most WordPress templates have a few similar structures at the beginning of the template. The first one is a "get_header()" function that does what you expect. Somewhere further along will be a PHP statement that says "if ( have_posts() )". This is the start of the "loop" that draws the posts. You want the new headline to go somewhere in between these two lines of code. Depending on the theme, there may be passages of HTML code, or the entire passage may be part of a PHP script. If you have HTML, just drop in an <h3> tag and add the new headline. If there isn't a break in the PHP code, add in the tags and headline using an echo statement. Save the file and check your categories again. You should see your headline at the top of all your categories and blogs.
(twentysixteen/archive.php)
<?php .
      .
      .
      get_header(); ?>

      <div id="primary" class="content-area">
         <main id="main" class="site-main" role="main">

<!-- Put your test headline here -->

      <?php if ( have_posts() ) : ?>
      .
      .
      .
Copy this file and rename it category.php. Change your headline to read "AMP JAM Category Template". Save the file into your child theme folder and view the categories again. You should see the new headline in all your categories. The parent theme likely did not have a category.php, but because the child theme does, WordPress will see the category.php template and use it instead of archive.php. However, your Blog is not a category, and will still use archive.php.
Do this once more, using the "slug" name for one of your categories. From the Dashboard, click Posts > Categories, then select a category to see the "Edit Categories" screen for the selected category. You will see the slug name there. Copy the category.php file and name the copied file category-{slug name}.php. Now edit the headline, changing "Category" to the category name. When you view your categories this time, only the named category will show the category name in the headline. Go back to the template hierarchy chart and study how what you have done is diagrammed in the template hierarchy chart.
Congratulations! You have customized a Wordpress template file using the template hierarchy. Look around for other ways you can identify and customize template files to get a little more experience. Next, we will look at ways to customize "The Loop" and get more control over the posts and how they look on the page.